Fork me on GitHub

CDIbase Tutorials

Open source CDI management software for language acquisition research.

How to do about anything in CDIBase

Hello! These comprehensive tutorials can help CDIBase users get started with the application's various functions. Looking for database schemas, environment setup, and other technical details? Check out the technical documentation.

How to access lab data

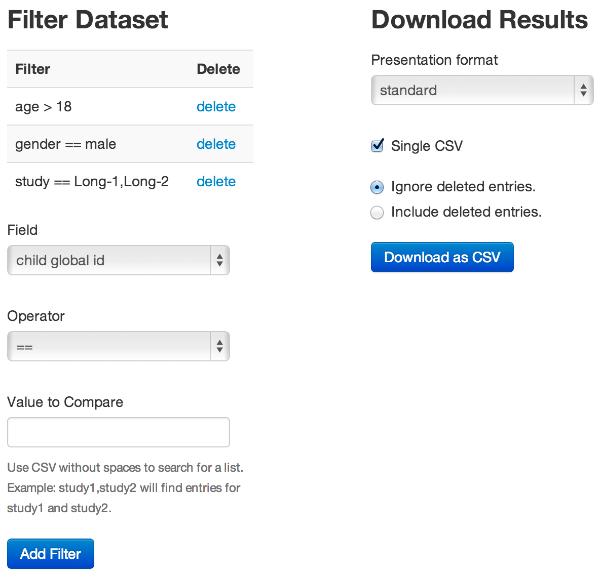
CDIBase allows authorized researchers to download lab data as CSV spreadsheets for LibreOffice, Microsoft Excel, and custom lab scripts / software.

  • Click "Access Data" in the navigation bar at the top of the page.
  • Select attributes and values to filter on. For example, the filters in the left screenshot will search for male participant CDIs within the Long-1 or Long-2 studies taken from participants older than 18 months of age.
  • == means search equal values, != means not equal to, >= means greater than or equal to, > means greater than but not equal to, <= means less than or equal to, and < means less than but not equal to.
  • Provide comma separated lists to allow multiple field values. A filter on field "study" with the "==" operator and a filter value of "Long-1,Long-2" will search for CDIs from both the Long-1 study and the Long-2 study.
  • Click the "Download as CSV" button to search the dataset using the current filters. By default, searches will ignore deleted data. The "Include deleted entries" check-box will instruct CDIbase to search both deleted and not deleted entries.
  • Advanced options:
    • The presentation formats dropdown menu dictates how common values like male, female, true, and false are reported in downloaded files (use male, m, boy, or something else).
    • CDIbase can combine results from many CDIs types into a single CSV file or provide a zip archive with one CSV per CDI type. Selecting the "Single CSV" checkbox will instruct CDIbase to combine all results into a single spreadsheet.

How to delete and restore lab data

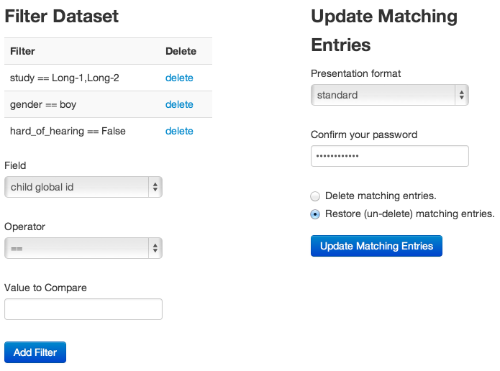
CDIBase allows authorized lab members to "delete" lab data. However, data removed though CDIBase can be restored and queried.

  • Click "Delete Data" in the navigation bar at the top of the page.
  • Select attributes and values to filter on. For example, the filters in the left screenshot will delete male participant CDIs within the Long-1 and Long-2 studies but only those taken from participants older than 18 months of age at the time.
  • == means search for values equal to while != means not equal to, >= means greater than or equal to, > means greater than but not equal to, <= means less than or equal to, and < means less than but not equal to.
  • Provide comma separated text to allow multiple field values. A filter on field "study" with the "==" operator and "Long-1,Long-2" for its value will filter for CDIs both from the Long-1 and the Long-2 studies.
  • Use the right side radio buttons to indicate if CDIbase should delete or restore CDIs matching the provided filters.
  • Click the "Update Matching Entries" button to delete or restore CDIs matching the provided filters.

How to import lab data

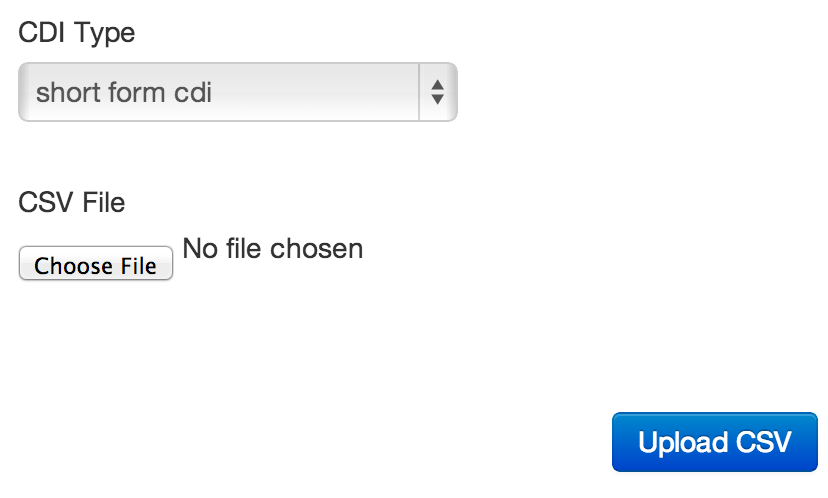
CDIBase allows authorized lab members to upload CDI results as CSV files (use LibreOffice, Microsoft Excel, or equivalent to create these spreadsheets). Starting as a CDIbase user request, future work will make the input format more flexible. Until then, CSV files should follow a prescribed CSV for upload layout.

For example, this example upload CSV file could be used for this sample CDI type.

Anyway, to import a CSV file,

  • Click "Import Data" in the navigation bar at the top of the page.
  • Select the type of CDI for which results will be uploaded. In the left hand screenshot, the user will upload a CSV file containing responses to the short form CDI format.
  • Browse for the CSV file to upload.
  • Click the "Upload CSV" button.

While the project plans for future improvements, be aware of current limitations / neuances with CSV data import:

  • CSV upload sets the hard of hearing field to false (let us know if you are waiting on this feature and we will bump up priority).
  • CSV upload cannot handle implied true and implied false values. This only affects a very small number of labs with difficult data migrations. See the tech docs.
  • Using the value "y" will result in 1 (or the value set in EXPLICIT_TRUE if using custom encodings) and the value "n" will result in 0 (or the value set in EXPLICIT_FALSE if using custom encodings).

How to send CDI forms to parents by email

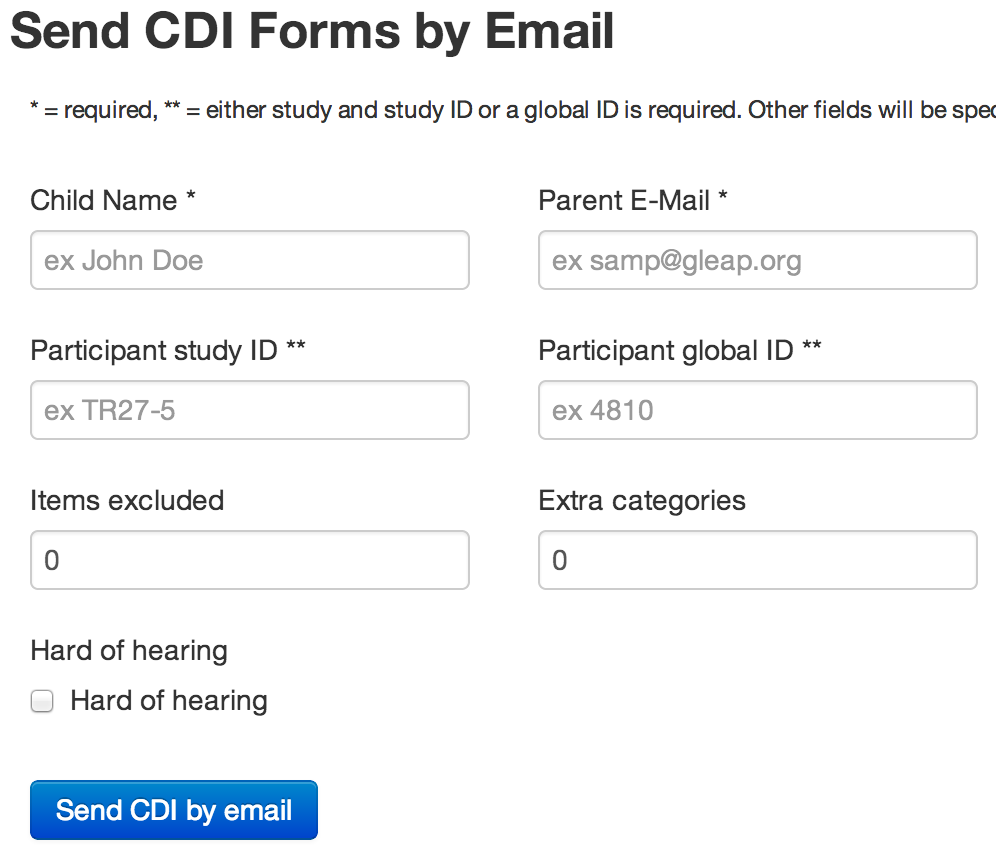
CDIBase allows authorized lab members to send CDI forms over the Internet. To request a CDI for a participant:

  • Click "Parents" in the navigation bar at the top of the page.
  • Input the actual name of the participant (will not be saved to the database long term). This is to help parents differentiate between siblings and confirm they received the correct electronic form.
  • Input the email address for the recipient of the CDI.
  • Select the type of CDI to have the parent / participant fill out.
  • If the participant has already completed at least one CDI for the current study, fill out at least one of the following:
    • Either the name of the study and the ID of the participant within that study (Study and Study ID fields).
    • or the lab-wide ID of the participant (Participant global ID field).
  • If the participant has not completed a prior CDI for the current study, fill out the remaining fields.
    • Study ID = The ID of the participant within that study. May be the same as the participant's lab-wide ID.
    • Participant global ID = The participant's lab-wide ID.
    • Items excluded = The number of items left off of the CDI. If uncertain, leave at 0.
    • Extra categories = The number of extra items / categories on the given CDI type. If uncertain, leave at 0.
    • Total number of expected sessions = The total number of CDIs the participant is expected to complete for the study.
  • Click the "Send CDI by Email" button.

How to manage users

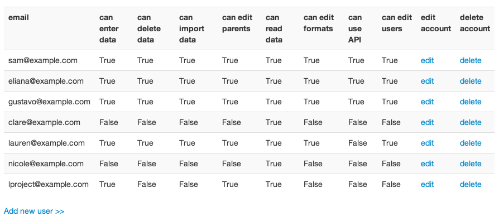
CDIbase supports many users with various levels of access granted to each user.

  • To add a new user,
    • Click "Users" at the top of the page.
    • Click the "Add new user" link.
    • Enter the new user's email address and level of access.
    • Click "Create User" and a temporary password will be sent to him / her by email.
  • To update a user,
    • Click "Users" at the top of the page.
    • Find the desired user in the application's access table and click the "edit" link.
    • Update that user's permissions and email address. Click "Edit User Account" to confirm.
  • To delete a user,
    • Click "Users" at the top of the page.
    • Find the desired user in the application's access table and click the "delete" link.

How to use the API

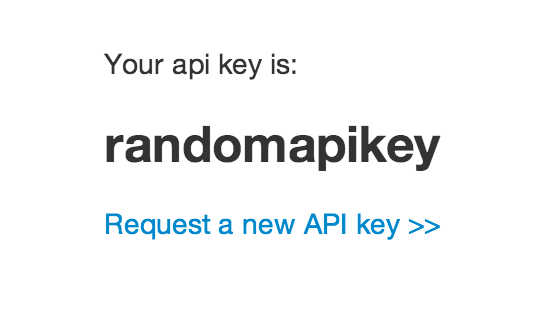
Custom scripts and outside software can automate tasks in CDIbase through a programatically accessible interface. See technical documentation for details of API usage. However, each user wanting API access must generate a key.

  • Click "API" in the navigation bar at the top of the page.
  • Click "Request a new API key" to generate a new user-specific API key. In the left-hand screenshot, "randomapikey" is the user's API key.
  • Note that requesting a new key for a user invalidates old API keys associated their account.

How to manage available types of CDIs

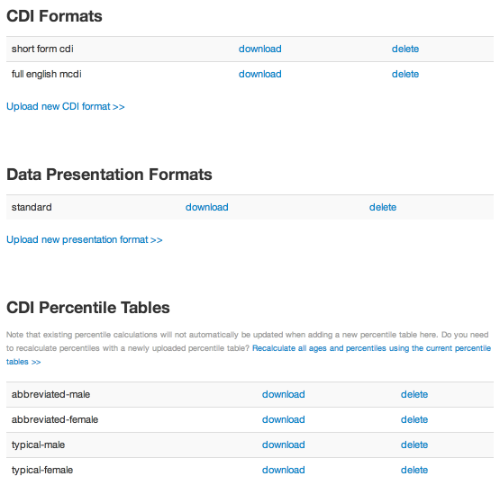
While CDIbase can store results from multiple CDI types, users must first provide the words within those CDI forms and other related information.

  • Click "Formats" at the top of the page.
  • To create a new CDI type
  • To modify an existing CDI type
    • Select the "download" link on the target CDI format.
    • Make the modifications to the prior CDI YAML file or create a new YAML file to replace it.
    • Click the delete link next the CDI type in the formats table.
    • Click on "Upload new CDI format" and provide the updated YAML file. Ensure the CDI type's name matches the name of the type just deleted.
  • To add new percentile information
    • Create a new CSV file with percentile information using LibreOffice, Microsoft Excel, or equivalent. See the example percentiles table or technical documentation for more info.
    • Click on "Upload new percentile table" and provide the spreadsheet for one percentile table.
    • Ensure the percentile table name matches the name specified in the CDI YAML file.
    • In most cases, users must provide different percentile tables for each gender. Repeat this process for the other gender(s) that will complete the CDI.
  • To update percentile information

    • Select "download" on the target percentile table.
    • Make necessary changes to the downloaded file in LibreOffice, Microsoft Excel, or equivalent.
    • Click "delete" next to the target percentile table.
    • Click on "Upload new percentile table" and provide the spreadsheet.
    • Ensure the new name matches the name of the percentile table just deleted. This should also correspond to the percentile table option within the CDI YAML specification file.
    • CDIbase does not automatically recalculate percentiles for existing CDIs. Researchers can recalculate percentiles on existing CDIs using new percentile information by clicking the "Recalculate all ages and percentiles using the current percentile tables" link.

    A future release will introduce alternatives to this table format for percentile information.

How to manage presentation formats

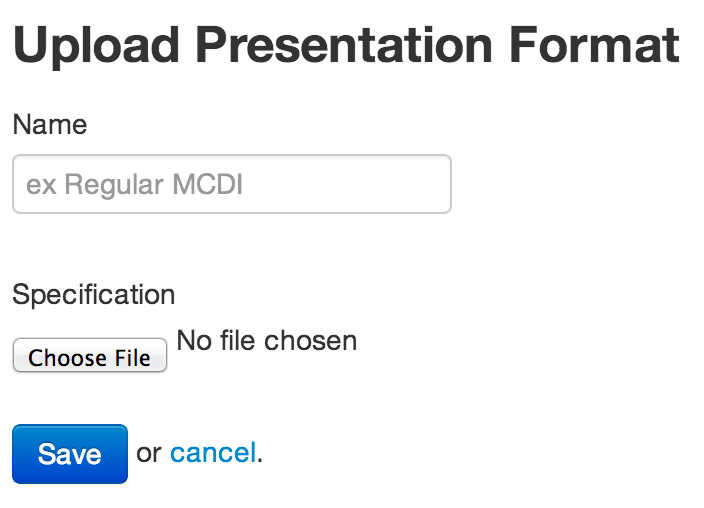
Presentation formats give users options for how CDIbase reports (encodes) common values like male, female, true, and false in CSV data downloads. Does some lab software use "boy" while the rest uses "male" for gender? CDIbase can not only store multiple types of CDIs across many studies but its presentation formats switch between encodings, allowing individual researchers to choose between values like "true" or "1" without duplicating data. Presentation formats are written as YAML files.

Examples of presentation format YAML files:

Instructions on adding new presentation formats:

  • Log into the lab's CDIBase website.
  • Click "Formats" at the top of the page.
  • Create a new presentation format specification YAML file. See technical documentation for additional details.
  • Many users may find the example presentation format suitable without modifications. Unfortunately, while future plans aim to make this easier for non-programmers, some technical experience could help making more advanced custom presentation formats. Don't have that expertise? Contact us and we might be able to help.
  • Click on "Upload new presentation format" link and, in addition naming the presentation format, provide the newly created YAML file.
  • Note that CDIbase will use the presentation format named "standard" as the default presentation format elsewhere within the application.

Creative Commons License Website / documentation licensed under a Creative Commons Attribution-NonCommercial-ShareAlike 4.0 International License.